|
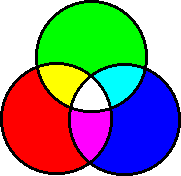
Happy genome tinkering with Alien (Modified for LiveGMS by N1)First: let me explain some termsGenom = totality of all genes Gene = small unit where informations are stored, informations about how a creatures should look like, how his organism is organised etc. Pigment gene = A part of information of how a norn's fur colour should be. If you want to have a norn keep his colours during the whole life, you'll need pigment genes for all of it's life stages. And there must be three of them for each of the life stages. Why three? Well, that leads us to ... Addition colours or: how to determine a colour of a nornLook at this diagram:
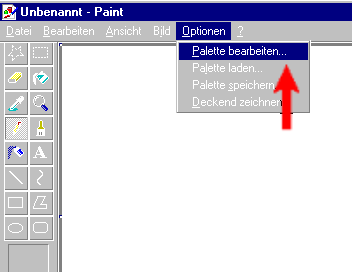
There are three so-called addition colours. The basic colours are: Red, Green and Blue (big circles). The area where they overlap each other are the mixtures of those colours. A mixture of green and red will get yellow, red and blue get pink. But what happens if we mix all of the three basic colours? Look on the middle area where all three circles overlap: the result is White! What did you say? "But my water colours are different when mixed!" Right. BUT: Water colours are so-called subraction colours. But norns have addition colours. So forget your water colours, they won't help you at all in finding the right colour for your norn! But then, what's helping me in finding the right colour for my norn?You'll need only one program which will make us able to look on addition colours. Did you say "I'm sure, I don't have this program"?. Wrong! You got it on your computer. Look under the start menu > accessories > paint. Paint? Yes! Paint! That's all we need right now. Open it up! I'll look much like this:
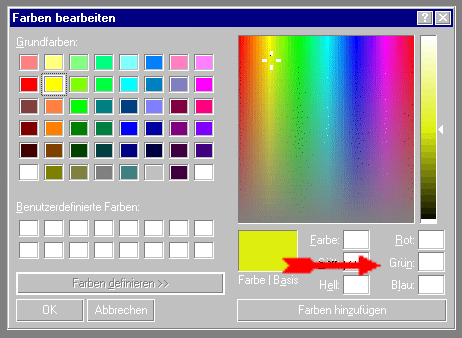
In the menu bar, go to "options" and then in the drop down menu on "edit palette" (sorry, my program's in German, that's why it looks like this on the picture!) Now a new window will pop up with some tiny colour boxes. Ignore these and click on the button "define colours" Now the whole box will look like this:
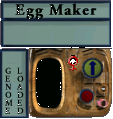
The area with all the rainbow colours you can move the little cursor around in order to find a colour that suits you. In the picture above you can see it in the yellow area. You can see the chosen colour in the bigger coloured box beneath it. Of course, it's yellow! On the right side of the rainbow colour window you can see an brightness scale. Move the small arrow up and down to make the colour brighter or darker. You will always see the current chosen colour in the bigger box underneath. Try it out, move the cursor around, make it brighter or darker. Get yourself accustomed to it. Can you find a nice bright violet? - Break point- Ready? Shall we go on? Okay. Now, you decided for a colour. As the picture above shows that nice yellow, I'll take that one, okay? Now, did you notice the big red arrow in the picture? Of course you did and you were wondering all the time what it means! Okay here comes the explanation: It points out three little boxes, for Red, Green and Blue (read from the top). Does that ring a bell? Yes! I mentioined exactly these colours as our basic colours for addtion colours! The numbers in the boxes tell, how much red, green and blue have to be mixed to get the colour in the bigger box on their left side. Think of it like a recipe: for the yellow I choose it needs a value of 222 of red, 239 of green and 16 of blue. The maximum value for each basic colour can be 255. The higher the value of the three colours the brighter the colour gets. So, what values did you get for you violet? Now, let's do some Norns!As I said, colours in norns are addition colours. Each pigment gene contains information about one of the three basic colours. And that's why it needs three pigment genes, each for one of the basic colours to determine a single colour you can see on the screen. A norn needs those informations for every life stage, so for every life stage a norn gets in it needs three pigment genes. A norn can have seven different life stages: baby, child, adolescent, youth, adult, old, senile. Let's reckon quickly: three genes for each of the basic colours (red, green, blue) and a norn's life contains seven different life stages...well 3 times 7 equals 21. So we will need 21 pigment genes in order to maintain a colour in a norn during its whole life. Enough theory, let's get practial!Okay, let's make a Norn that will have a yellow colour during it's whole life. We noted down the information of the colour table from the paint program, 222 for red, 239 for green, 16 for blue. 1. Go to LiveGMS 2. Select the "Browse" button 3. Browse through your folders and search for the file called "bunt.gen". If you have not done yet, you can download it above. 4. double click on the file "bunt.gen" 5. Select the button "Load genome file". Providing that there hasn't been any problem, select "Back to main screen" now. 6. Click on "Type" in the header row of the big table. By doing this, all genes are sorted by their function. This will make it much easier to find the pigment genes later. 7. Find the pigment genes ("Creature Pigment"). To reach them instantly, try to enter 762 into the "Goto gene" field and confirm by pressing enter or click on the "Go!" button. Maybe you have already noticed, that exactly 100 genes are listed on one page. To reach the next 100 ones, you have to click on the "Go!" button on the top of the page. 8. This genome we loaded is kind of a "template" and already contains 21 pigment genes. Let's open the first one. To do this, find it in the gene list and choose "Modify body". You should see "Red" selected in the color field. 9. Okay, now we know this gene must be a red pigment gene. And there's another box, titled "Amount" and a field with a number besides that. The number is "0" (zero). 10. Do you still remember what we noted down for our red colour? It was "222", wasn't it? 11. Okay, then change the number in the amount box from 0 to 222. By doing this we change the amount of the color red, which will be "transfered" to our Norn later. Confirm with "Submit changes" and that was it! We "reprogrammed" a pigment gene! How do you feel, Mr. Frankenstein? :-) 12. Now let's go on, we haven't finished yet. Click on "Modify Body" by the next pigment gene in the table. It's a green one this time. Do the same as we already have done with the first pigment gene, except that you use the value we've written down for green now of course. 13. And again the next one. Go on and change all pigment genes just as you did before: blue ones to intensity 16, red ones to intensity 222, green ones to intensity 239. 15. Phew! Bit boring, isn't it? Well, but you have to concentrate, otherwise the colour won't be right in the end! 16. Finished? Changed all genes? Excellent! 17. Now navigate to the top of the page and select "Save genome file" there. Depending on your browser's configuration, you just click on "here" or use the right mouse button and then use "Save link target as" to ave the file. Now it is very, very important to select the follwogin folder on your disk: Program Files > Creatures3 > Genetics (If you use Linux: .creatures3/Genetics or .dockingstation/Genetics inside your home directory). You should give the file a good name. Let'S take "bunt.gen" just like the original file for example. (Important! The file name should not be longer than 8 letters!!). Click on "Ok" to finally save the genome. Phew! that took quite a long time! But how do I get now my Norn??Do you happen to have the EggMaker from JayD in your world? You can also download it from Mummy's HP . Unzip the downloaded .zip file and put the Eggmaker.agent file into the folder "My agents". The file named "replicator.cos" goes into the subfolder "001 World" in the folder "Bootstrap". No open your C3 game and your world. Go to the agent injector and inject the Eggmaker. It looks like this:
Done? Good, then let's go on! 1. Click in the text area below the name "Egg Maker". Now type there: bunt (or the name you gave the before saved genome) Please note: you don't have to type the file extension ".gen", just the name of the file. 2. Press "enter" on your keyboard. 3. See that small symbol "female"? If you click on that it will change to a "male" symbol and that's how you determine the sex of the norn you want to "produce" with the Egg maker. Err...let's make the egg a female one, okay? 4. Click on the red button (below the button with the arrow on it) 5. An egg!! An egg!! 6. And now? 7. Hatch it!!! :-)) 8. Have fun! |


